Applying Dependency Injection to Composable Routing in Swift for iOS Apps - Part 2

My life changed in 2011 when I fell in love with iPhone and started working as an iOS Developer.
I'm passionate about clean and effective code, code review, organisation, agile work, sharing knowledge and experiences, but above all I'm passionate about building awesome products.
This is the second part of a series of articles about a Clean, Simple and Composable Routing for iOS apps. Have a read at the first article before starting this one 😊
In the previous article , we setup our routing system by instantiating the dependencies directly in the routes. Although our routes are very isolated and reusable, they're very hard to test and maintain as our app grows. Let me show you why.
Here's our LoginRoute. It's exactly as we implemented it previously:

Instantiating the LoginViewModel on line 11 directly seems fine now, since it only takes one argument, however, in real applications this will be rarely the case. Most applications consume APIs and/or databases. If it was the case here, we'd have to inject an APIClient, perhaps UserDefaults or a Data Repository, and so on.
Updating the LoginViewModel initialiser throughout the app every time its init changes isn't the worst part of this issue. If we hardcode an APIClient in our route, for example, how will we be able to mock it and avoid real network requests while running unit tests? 🤔
Now imagine the APIClient injected into the LoginViewModel also has its own dependencies. Do you see where I'm getting at? Managing dependencies is hard 😰.
Perhaps it's time to discuss a few concepts of dependency management in order to better understand how to improve our code and solve this problem.
Dependency Management
First of all, have a read at Vadim Bulavin's post on dependency injection in Swift. He goes through the most relevant design patterns for DI and it'll bring you up to speed in some concepts we're going to discuss.
I like to think that our Routers (or even Coordinators) are the glue that sticks the whole app together. Even if your app has a lot of business logic and only a couple of screens, it still needs some type of view controller orchestration to ensure they've been instantiated and presented properly.
Routers already have the context of instantiating the screens and their dependencies to be presented, which means that routers implicitly resolve dependencies.
In mid to large size applications there will be many routes and many dependencies to manage. If we were to inject every single one of them into the DefaultRouter's initialiser, in order to the router then inject them into each route's screen, we would end up with a large amount of properties and our router would look more like a dependency container than a router per se.
Let's have a look into using a Service Locator or a Dependency Injection Container to solve this. There's a great article from Martin Fowler about this 👌.
A Service Locator is a common practice, even in iOS, where you have an environment object , usually a singleton, that holds all the dependencies required by the app and you access them everywhere. This approach hides away the dependencies from the developers since they're accessed anywhere in the classes methods, making it harder to maintain the code and even test sometimes.
A proper Dependency Injection implies that the container, where all dependencies instances and factories are registered, cannot be accessed through the app, following more strictly SOLID principles and encapsulation, differently to a Service Locator. It gives full control of what's being injected as well as clear understanding of a class' dependencies since it requires them to be passed in in the classes' initialisers.
My personal take, which depends on the project's scope and necessities, is that both approaches have their pros and cons, and even though I like the Dependency Injection approach better in theory, it adds quite some extra complexity to hide the dependency container from the app. Extra protocols and assembly techniques are required to make it work. However, I also don't like the Service Locator approach of resolving dependencies everywhere, without clear understanding of the classes dependencies, which violates SOLID and encapsulation, making our lives much harder down the track for refactoring, breaking an existing app down into multiple modules, etc.
Going back to the Routers, if we accept that they're responsible for instantiating the screens and their dependencies in order to present them, we can make a "compromise" where we allow them to have access to the dependency container. It will enable Routers to resolve the dependencies and inject them directly into the screens to be presented. Our code will be flexible, testable and leaking little knowledge about the dependency container in the app.
Different to a simple Service Locator, our dependency container will not be a singleton per se, however there will be only one instance in the app, that's going to be held by our SceneDelegate, which virtually means it'll be kept in memory while the app is running. Once the container is created and all dependencies are registered into it, the container is then passed in as an argument to the mainRouter, which will instantiate new routers and continue to pass the same container into them.
There you have it, our routes are the pipes of our a dependency graph's plumbing system 🚰.
Dependency Container
As Fowler showed in his article, a dependency container is as simple as registering and resolving classes. I built a micro framework that does that. I called it Dependency Container (ha! 😜).

It is as simple as registering a factory, which will return a new instance every time it's resolved, and also registering a singleton, which will always return the same instance when resolving it.
There are a few extra methods for registering and resolving values with arguments. Have a look at the full implementation here 🕵️♂️.
It's a good practice to register interfaces (A.K.A. protocols) instead of concrete classes because when testing we can just register a mock class instead of the real implementation for that same interface, allowing us to have full control of its behaviour.
What's very nice about this micro-framework is that it allows us to easily resolve dependencies recursively. For example:
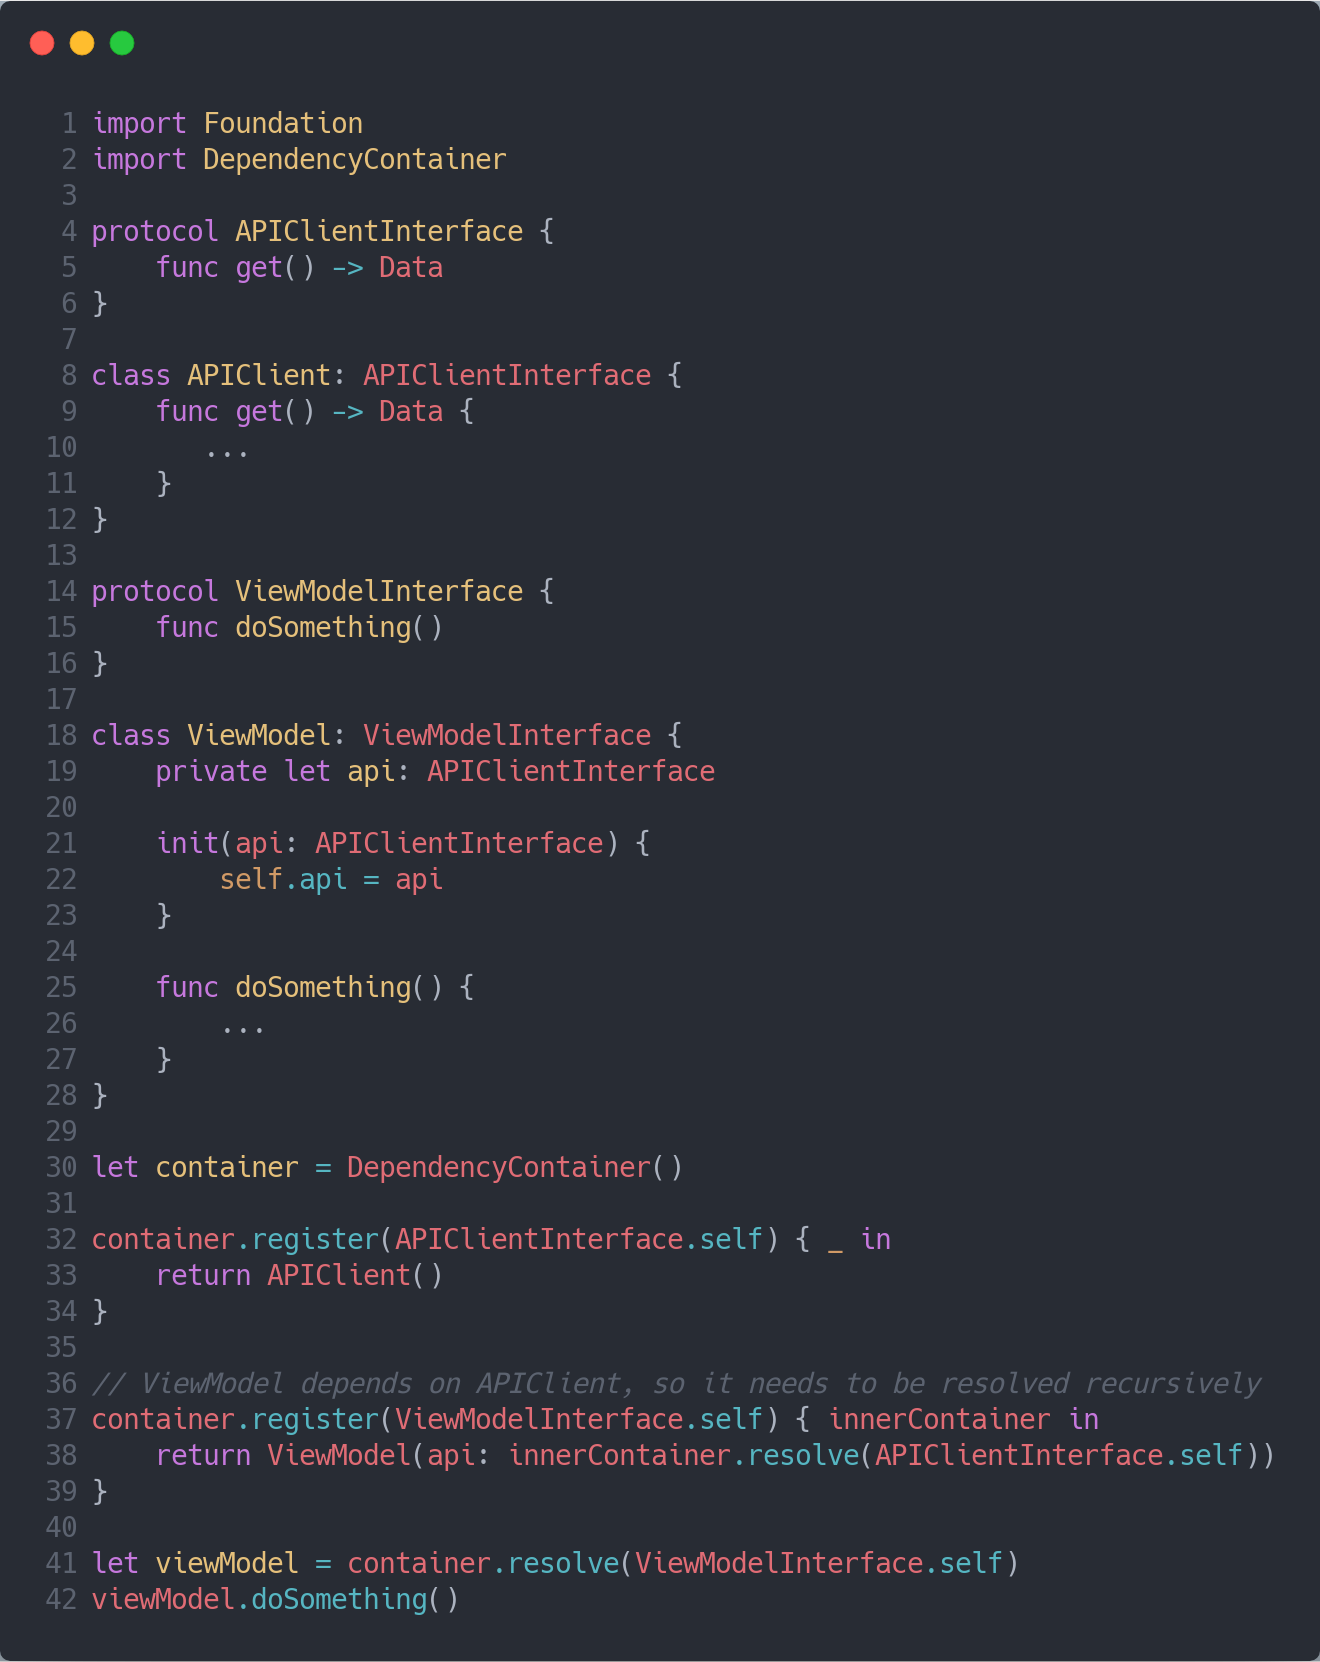
As you can see, in order to instantiate a ViewModel we need to instantiate an APIClient, line 21. Once they've been properly registered, the container is able to resolve them recursively, as shown on line 38 😎.
Alright, back to our sample project. Let's add the Dependency Container micro-framework as a dependency to our project using Swift Package Manager and get to it!
Resolving Dependencies in the Routers
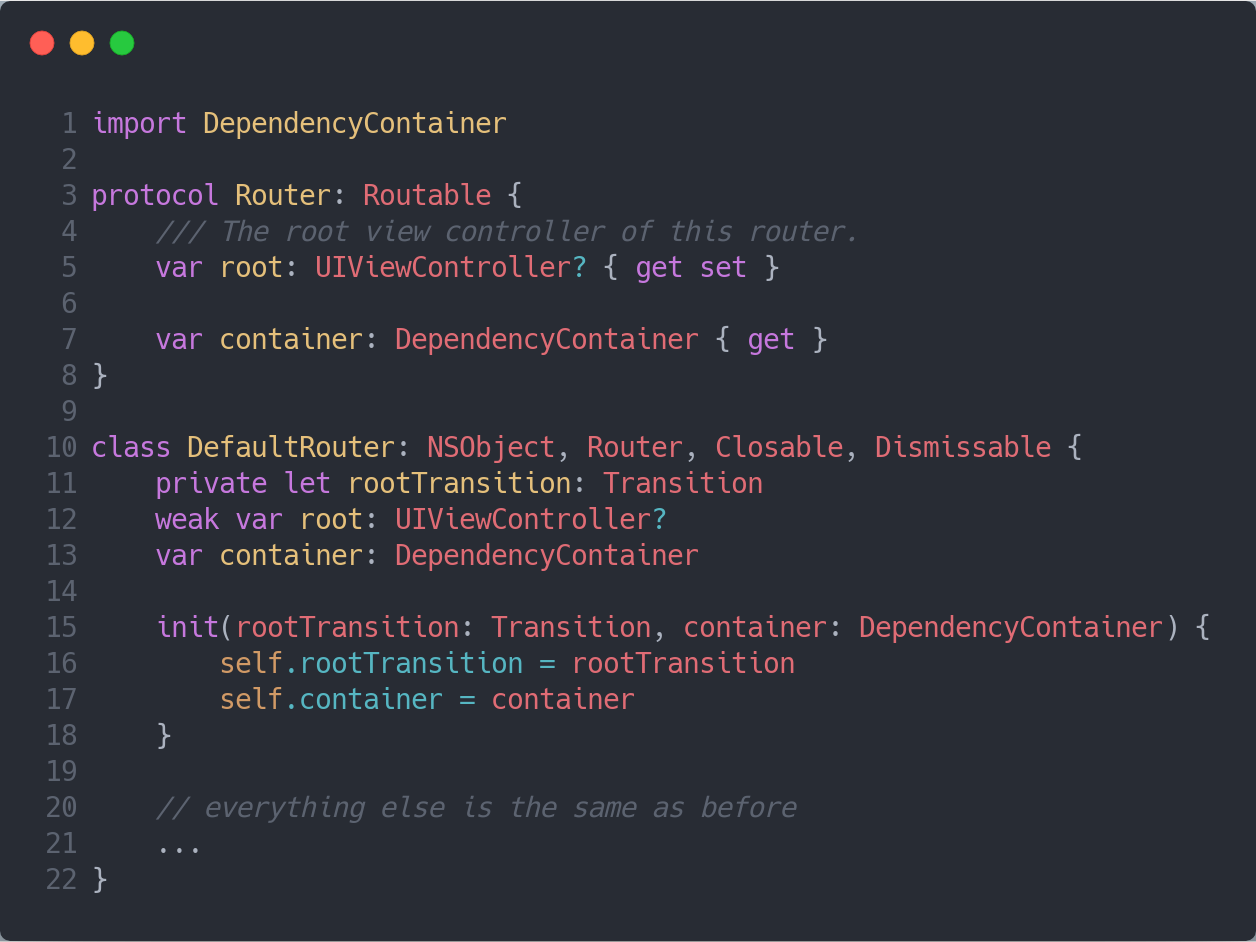
We'll update the Router protocol to include a read-only property to the container and add it to the DefaultRouter.
We need now to create interfaces for all view models that will be resolved by the routers. There's nothing special about it, it's very common practice in iOS development, but let me show you an example:
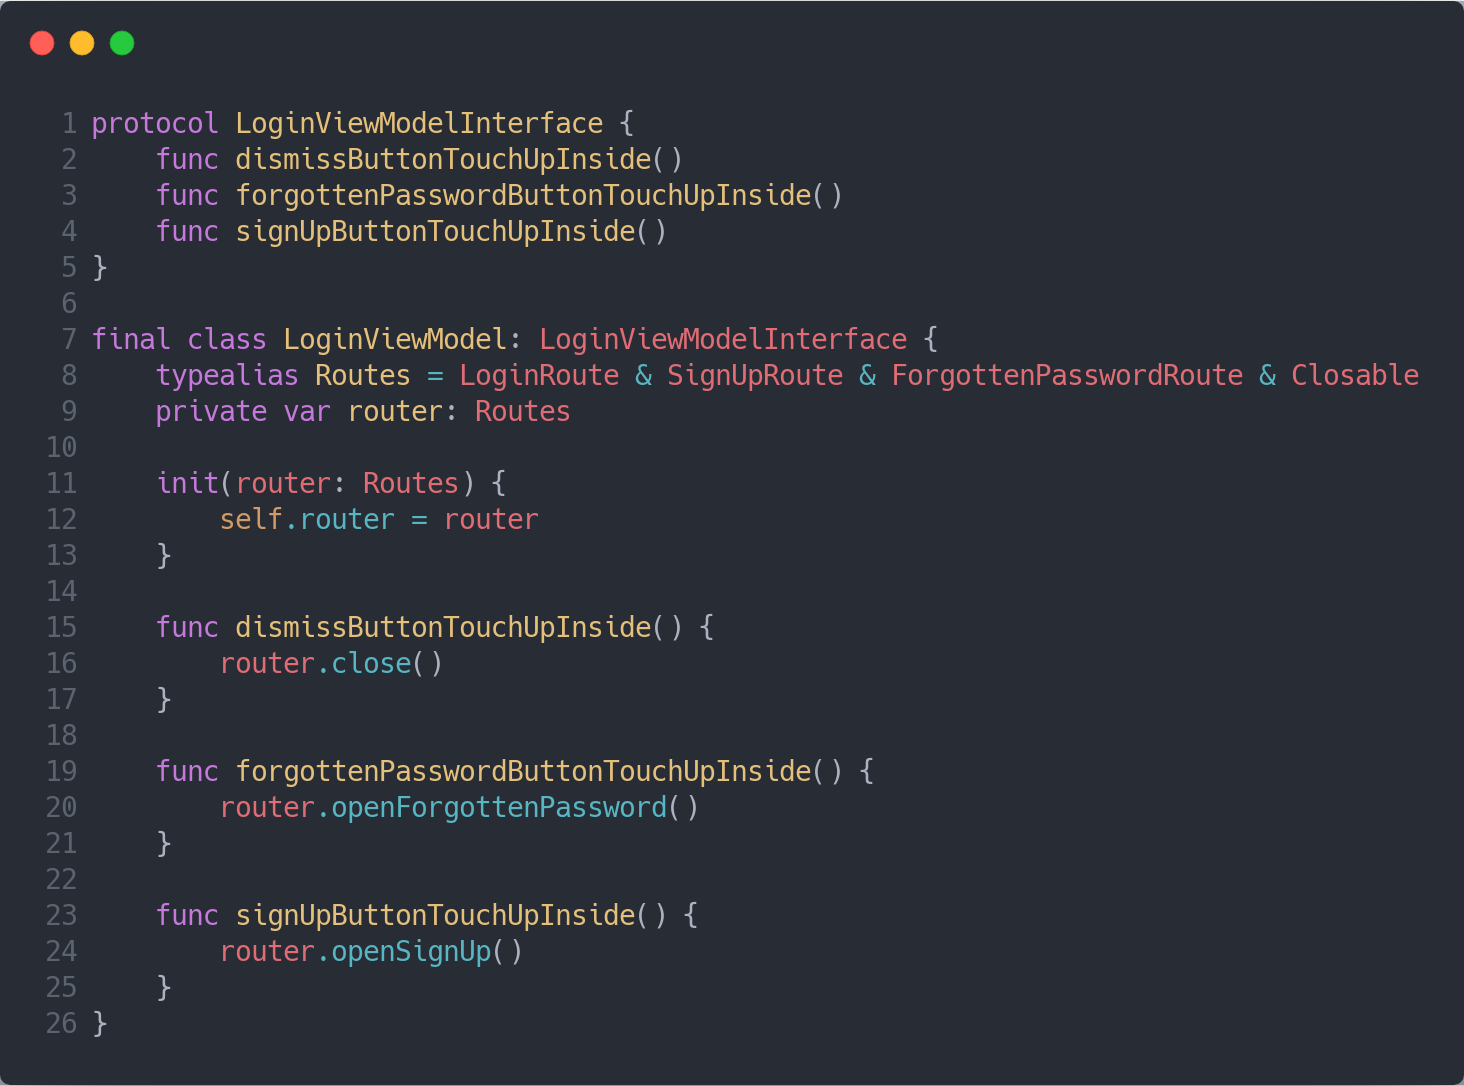
Make sure to update the view model type in the LoginViewController to be referencing the LoginViewModelInterface instead.
Once all view models have their respective interfaces, it's time to build our dependency graph 🌳.

Since all view models take their own routes types as an argument in their initialisers we need to register the dependencies expecting those same types to be passed in as arguments.
The first argument that was omitted with an underscore is the container itself, in case the dependency needs to resolve other dependencies recursively, as shown in an example earlier, but this isn't the case here.
Note that the
PopUpViewModelalso takes a message as an argument on line 24.
Now we should instantiate the graph, register the dependencies in the app's start-up and inject the container into the mainRouter.
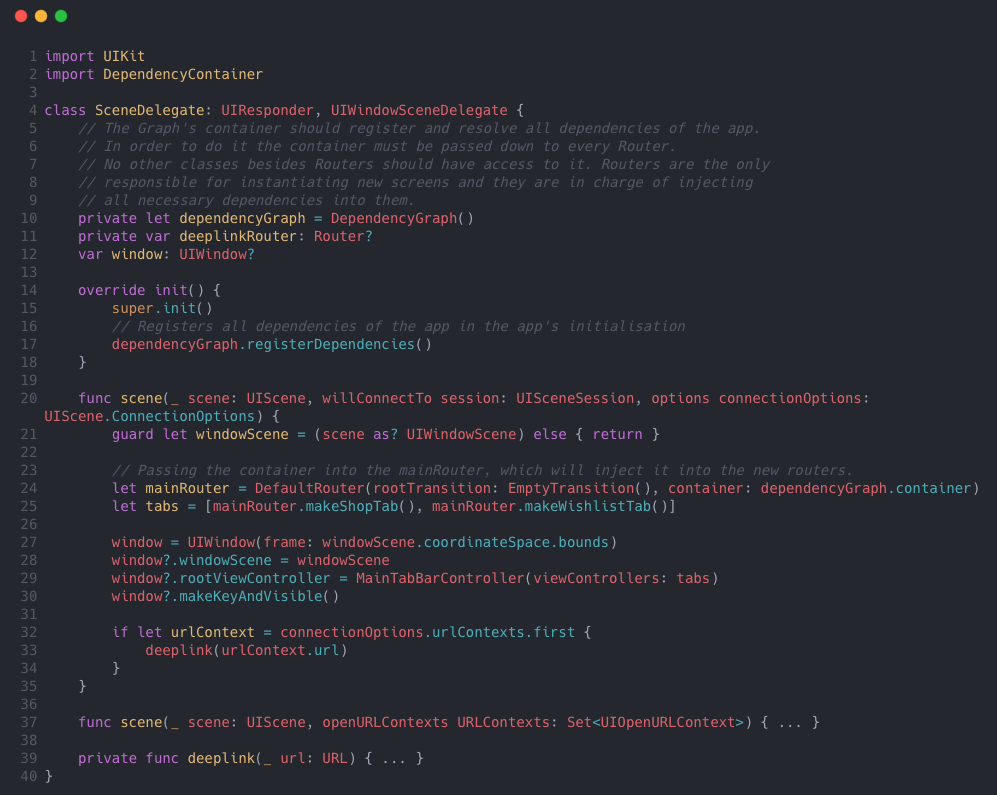
The graph object is created on line 10, instances are registered on line 17 and the container is passed into the mainRouter on line 24. Everything else is the same as before.
We've got our container with all view models registered in it, and the routers are setup with it, we should be able to update the routes to resolve the dependencies using the given container.
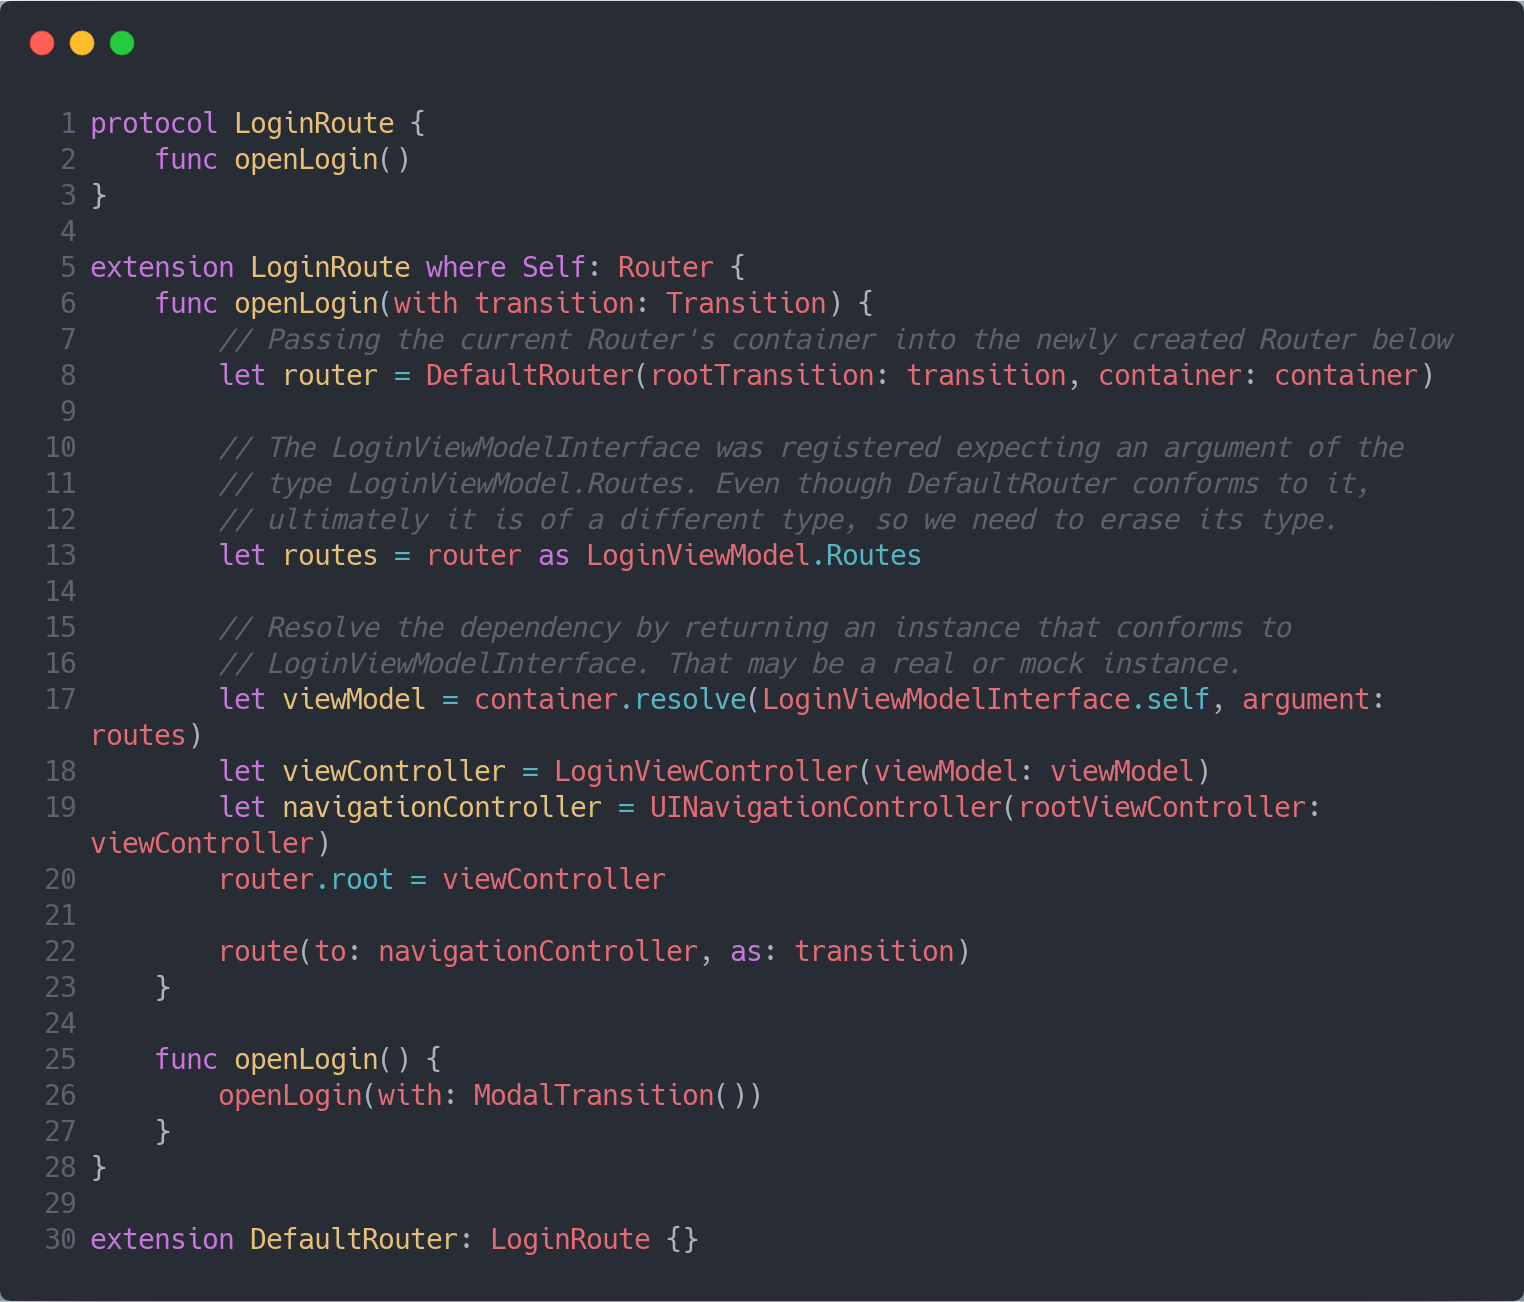
On line 8 the current router that's executing the openLogin method passes into the newly create router its container. This ensures we're cascading down the same dependencies 👌.
We saw in the DependencyGraph that each view model was registered with their respective routes as a required argument. Even though DefaultRouter conforms to all those routes, its type is still DefaultRouter and the dependency registration expects the type LoginViewModel.Routes, in this case.
In order to resolve this dependency correctly we must erase the DefaultRouter's type by casting it to LoginViewModel.Routes.
On line 18 we instantiate the view controller directly by injecting the resolved LoginViewModelInterface instance. Alternatively you could also register the view controller and resolve it directly. However, I personally find this step unnecessary once my view controllers don't perform any logic other than binding data from and to the view model. It's easier to manage and quite simple to test it for me in the way showed in the code above, but it's up to you! 😊
We're ready to apply the same pattern to all other routes. If you paid close attention to the DependencyGraph you've noticed that PopUpViewModelInterface is registered expecting two arguments. It's the same pattern as before, just with an extra argument. Have a look:
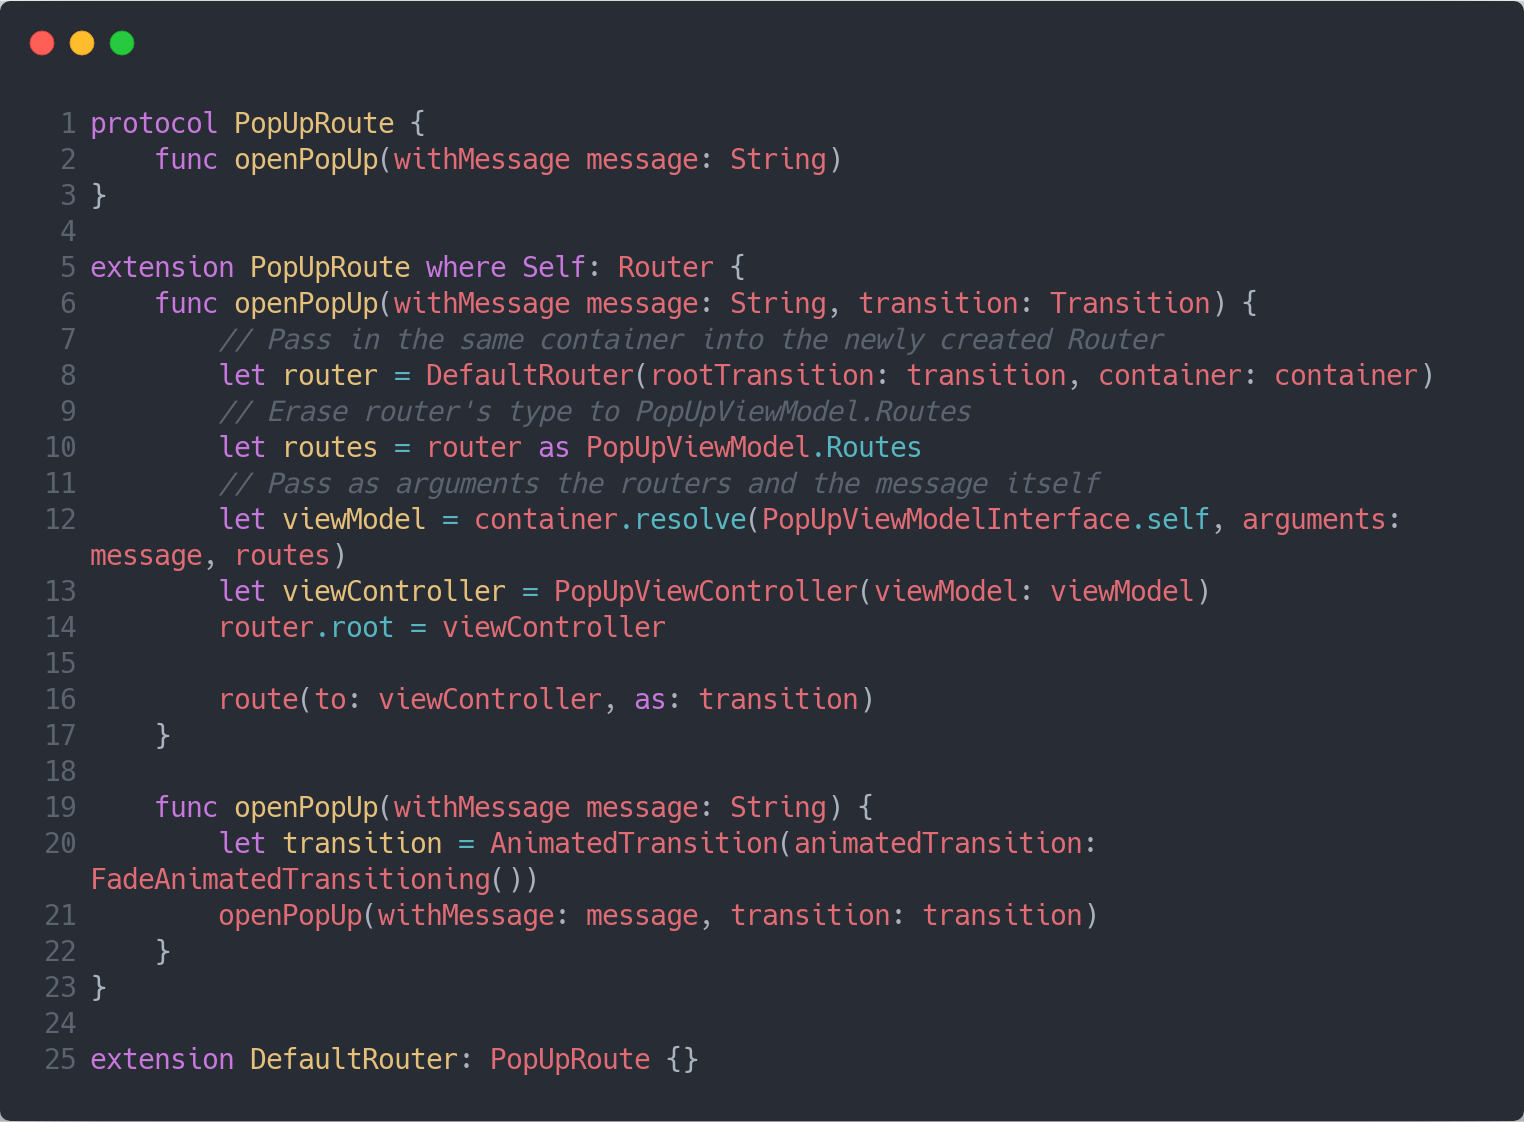
Make sure you pass the arguments in in the same order as you registered them. An alternative to avoid multiple arguments and even the type erasing for the routes is to create a simple struct that contains all expected arguments to resolve the view model.
That's it! Once all routes are updated our app is working with a composable routing system powered by the same dependency container 👏.
Conclusion
We've come to the end of another long post, but hopefully it's been useful to you!
Don't forget to check out this post's branch on Github and explore this idea further.
The next article of this series will show how this approach is very easy to test.
If you like this series, leave a comment here or drop me a message on Twitter saying hello 🤗!