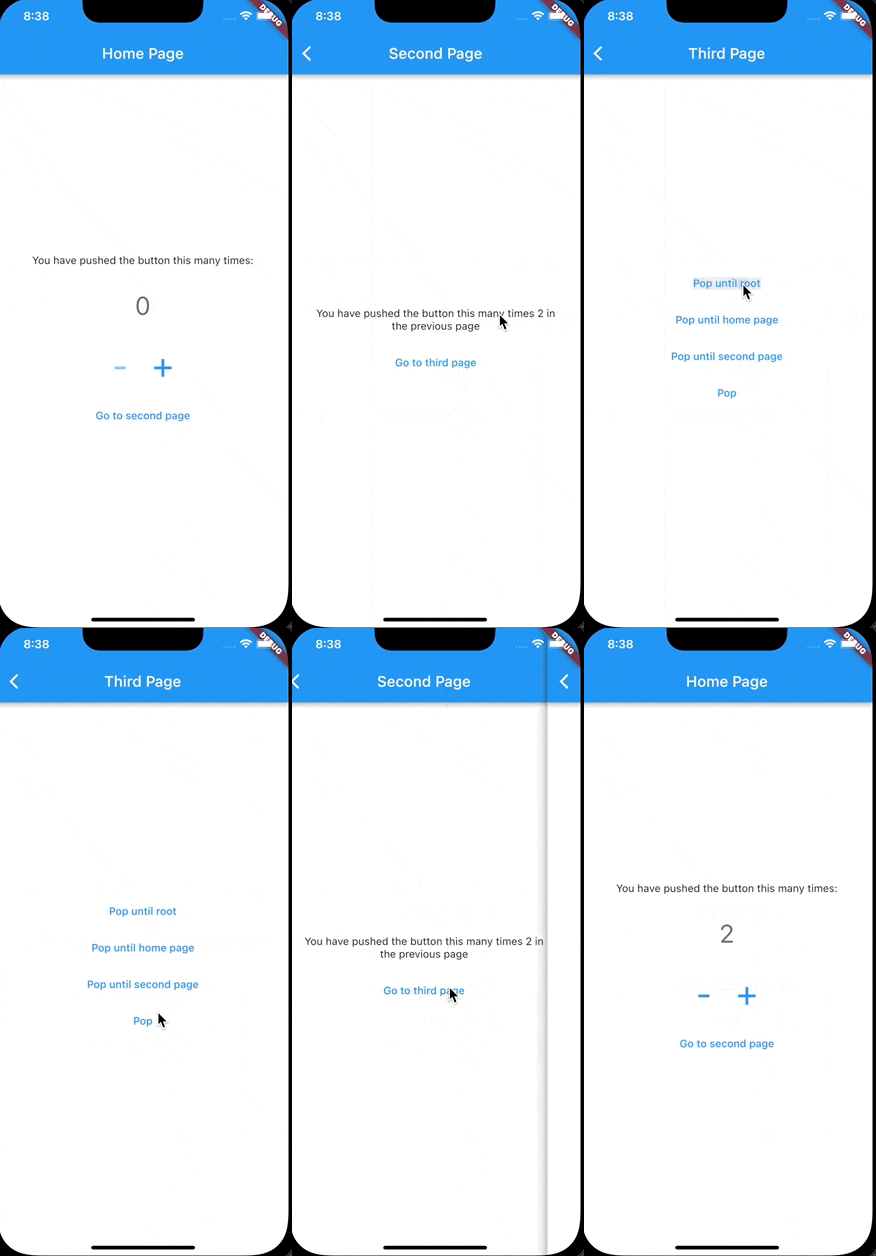
In the previous post we went through the basics of setting up the view models, moving all the logic from Widgets to the VMs, making it very simple to test and reason about action/effect.
That's nice, but what about routing?
Routing
I want to route somewhere once the user taps a button, or an API call finished, how do we do it? 🤔
ViewModels really shouldn't be handling widgets, context, Navigator, themes, etc. We should really only handle user actions and transform them in effects, either through State update or a route change, for example.
Let's map this necessity we have to represent routing in an object.
enum AppRouteAction {
  pushTo,
  pop,
  popUntil,
  popUntilRoot,
  replaceWith,
  replaceAllWith
}

class AppRouteSpec {
  /// The route that the `action` will use to perform the action (push,
  /// replace, pop, etc).
  final String name;

  /// Arguments for the route. Arguments for Pop actions are ignored.
  /// Default empty.
  final Map<String, dynamic> arguments;

  /// Defaults to `AppRouteAction.pushTo`
  final AppRouteAction action;

  const AppRouteSpec({
    required this.name,
    this.arguments = const {},
    this.action = AppRouteAction.pushTo,
  });

  const AppRouteSpec.pop()
      : name = '',
        action = AppRouteAction.pop,
        arguments = const {};

  const AppRouteSpec.popUntilRoot()
      : name = '',
        action = AppRouteAction.popUntilRoot,
        arguments = const {};
}
These are the most common actions performed, pushing, replacing and popping screens.
In this series I'm making this very simple and using
Stringas the route/page name. In your app you can create your own interface/object to represent each page and their arguments, instead of relying on hardcoded values such as strings and maps. An alternative is to use a library that generates code for the specified routes, such as auto_route.
Now in the view.abs.dart file, which is our View interface that all pages implement, we'll add a helper method that takes in a Stream<AppRouteSpec> and makes use of Navigator to handle it.
/// Listens to the stream and automatically routes users according to the
/// route spec.
StreamSubscription<AppRouteSpec> listenToRoutesSpecs(
    Stream<AppRouteSpec> routes) {
  return routes.listen((spec) async {
    switch (spec.action) {
      case AppRouteAction.pushTo:
        await Navigator.of(context).pushNamed(
          spec.name,
          arguments: spec.arguments,
        );
        break;
      case AppRouteAction.replaceWith:
        await Navigator.of(context).pushReplacementNamed(
          spec.name,
          arguments: spec.arguments,
        );
        break;
      case AppRouteAction.replaceAllWith:
        await Navigator.of(context).pushNamedAndRemoveUntil(
          spec.name,
          (route) => false,
          arguments: spec.arguments,
        );
        break;
      case AppRouteAction.pop:
        Navigator.of(context).pop();
        break;
      case AppRouteAction.popUntil:
        Navigator.of(context)
            .popUntil((route) => route.settings.name == spec.name);
        break;
      case AppRouteAction.popUntilRoot:
        Navigator.of(context).popUntil((route) => route.isFirst);
        break;
    }
  });
}
Nothing too special so far, just a neat way of transforming a business logic representation of a route into something Flutter understands.
Navigating between screens
In order to exemplify how easy and powerful this approach is, we'll add two other screens to the app.
A second page that takes count as an argument and a third page that shows how pop, popUntilRoot and popUntil work.

We'll add a button to the HomePage and link that button to the view model, that will expose a PublishSubject as a Stream.
PublishSubject emits to an observer only those items that are emitted by the source Observable(s) subsequent to the time of the subscription. The main difference between PublishSubject and BehaviorSubject is that the latter one remembers the last emitted item. Route changes are action based one-off operations, hence PublishSubject is preferred.
class HomePageViewModel extends ViewModel {
  final _stateSubject = BehaviorSubject<HomePageState>.seeded(HomePageState());
  Stream<HomePageState> get state => _stateSubject;

  final _routesSubject = PublishSubject<AppRouteSpec>();
  Stream<AppRouteSpec> get routes => _routesSubject;

  void plusButtonTapped() {
    ...
  }

  void minusButtonTapped() {
    ...
  }

  void secondPageButtonTapped() {
    _routesSubject.add(
      AppRouteSpec(
        name: '/second',
        arguments: {
          'count': _stateSubject.value.count,
        },
      ),
    );
  }

  void _updateState(int newCount) {
    ...
  }

  @override
  void dispose() {
    _stateSubject.close();
    _routesSubject.close();
  }
}
The new secondPageButtonTapped method shows how to push a new route. In this case the route's action is the default (omitted) .pushTo.
Always remember to
.close()subjects on dispose to ensure resources are released and subscriptions terminated.
Now in the widget, thanks to our new View's helper, all we need to do is to listen to the new stream.
class _HomePageState extends ViewState<HomePage, HomePageViewModel> {
  _HomePageState(HomePageViewModel viewModel) : super(viewModel);

  @override
  void initState() {
    super.initState();
    listenToRoutesSpecs(viewModel.routes);
  }

  @override
  Widget build(BuildContext context) {
    ...
    // I've added the new button in the column and linked it to the VM
     AppButton(
        onTap: viewModel.secondPageButtonTapped,
        child: Text(
           'Go to second page',
           style: Theme.of(context)
           .textTheme
           .button
           ?.copyWith(color: Colors.blue),
         ),
     ),
  }
}
Testing this new method is as simple as this:
test('secondPageButtonTapped pushes second page', () async {
  // Set count to one
  viewModel.plusButtonTapped();

  // delay execution so the event it caught by the Routes Publish
  scheduleMicrotask(viewModel.secondPageButtonTapped);
  final route = await viewModel.routes.first;

  expect(route.name, '/second');
  expect(route.action, AppRouteAction.pushTo);
  expect(route.arguments, {'count': 1});

  viewModel.dispose();
});
Second and Third pages
Besides the build method all pages follow the same standard:
class SecondPage extends View<SecondPageViewModel> {
  // ViewModel is an argument in the constructor
  const SecondPage({required SecondPageViewModel viewModel, Key? key})
      : super.model(viewModel, key: key);

  @override
  _SecondPageState createState() => _SecondPageState(viewModel);
}

class _SecondPageState extends ViewState<SecondPage, SecondPageViewModel> {
  _SecondPageState(SecondPageViewModel viewModel) : super(viewModel);

  @override
  void initState() {
    super.initState();
    listenToRoutesSpecs(viewModel.routes);
  }

  @override
  Widget build(BuildContext context) {
    ...
  }
}
The only difference from the previous post is that now ViewModel is an argument in the constructor and the initState listening to the routes.
Pushing dependencies, in this case the ViewModel, to constructors, instead of instantiate them or using Service Locators, such as GetX, directly in the class, allow us to easily control the dependencies, as well as easily replace and/or mock them. The more we "push down" the responsibility of resolving dependencies, the better. We'll talk more about it in future posts.
class SecondPageState {
  final int count;

  SecondPageState({
    this.count = 0,
  });

  SecondPageState copyWith({
    int? count,
  }) {
    return SecondPageState(
      count: count ?? this.count,
    );
  }
}

class SecondPageViewModel extends ViewModel {
  final _stateSubject =
      BehaviorSubject<SecondPageState>.seeded(SecondPageState());
  Stream<SecondPageState> get state => _stateSubject;

  final _routesSubject = PublishSubject<AppRouteSpec>();
  Stream<AppRouteSpec> get routes => _routesSubject;

  SecondPageViewModel({required int count}) {
    _stateSubject.add(SecondPageState(count: count));
  }

  void thirdPageButtonTapped() {
    _routesSubject.add(
      const AppRouteSpec(name: '/third'),
    );
  }

  @override
  void dispose() {
    _stateSubject.close();
    _routesSubject.close();
  }
}
The SecondPage view model follows the same standard, since it has dynamic state to be presented in the screen, we added it to the State object and the state stream. It might look overkill and unnecessary due to the simplicity of the screen, but believe me, in real applications, scope changes often and following patterns/standards, such as this one, makes it much easier to add/manage new state and update screens.
Here's another example:
class ThirdPageViewModel extends ViewModel {
  final _routesSubject = PublishSubject<AppRouteSpec>();
  Stream<AppRouteSpec> get routes => _routesSubject;

  void popUntilRootButtonTapped() {
    _routesSubject.add(
      const AppRouteSpec.popUntilRoot(),
    );
  }

  void popButtonTapped() {
    _routesSubject.add(
      const AppRouteSpec.pop(),
    );
  }

  void popUntilHomeButtonTapped() {
    _routesSubject.add(
      // will pop pages until the page name '/' (home) is visible
      const AppRouteSpec(name: '/', action: AppRouteAction.popUntil),
    );
  }

  void popUntilSecondButtonTapped() {
    _routesSubject.add(
      // will pop pages until the page name '/second' is visible
      const AppRouteSpec(name: '/second', action: AppRouteAction.popUntil),
    );
  }

  @override
  void dispose() {
    _routesSubject.close();
  }
}
Since the third page does not show any dynamic content, there's no need for a state stream at this stage, but everything else follows the same patterns.
I won't show the third page widget because it's basically the same as the others. You can see the full code and tests here.
Listing all routes
Let's create a routes.dart file with all routes specified:
class AppRouter {
  Route<dynamic>? route(RouteSettings settings) {
    final arguments = settings.arguments as Map<String, dynamic>? ?? {};

    switch (settings.name) {
      case '/':
        return MaterialPageRoute(
          // Make sure to pass `setting` in to ensure the route name is kept
          settings: settings,
          builder: (_) => HomePage(viewModel: HomePageViewModel()),
        );
      case '/second':
        final count = arguments['count'] as int?;

        if (count == null) {
          throw Exception('Route ${settings.name} requires a count');
        }

        return MaterialPageRoute(
          settings: settings,
          builder: (_) => SecondPage(
            viewModel: SecondPageViewModel(count: count),
          ),
        );
      case '/third':
        return MaterialPageRoute(
          settings: settings,
          builder: (_) => ThirdPage(viewModel: ThirdPageViewModel()),
        );
      default:
        throw Exception('Route ${settings.name} not implemented');
    }
  }
}
This class has a routes method that matches the requirements from MaterialApp.onGenerateRoute. Here we map the names to the pages, handling their arguments and such. This is probably the best place to resolve dependencies. For example, instead of using a Service Locator like GetX through out the app, you only resolve it here, keeping your code clean, easy to test and maintain, following SOLID as much as possible. More about that in future posts.
Another suggestion is to have multiple routes files, one per group of features, so you don't end up with a huge single file.
It's time to update main.dart to point to the new routes:
void main() {
  runApp(MyApp());
}

class MyApp extends StatelessWidget {
  final _router = AppRouter();

  MyApp({Key? key}) : super(key: key);

  @override
  Widget build(BuildContext context) {
    return MaterialApp(
      title: 'Flutter Demo',
      theme: ThemeData(
        primarySwatch: Colors.blue,
      ),
      navigatorObservers: [routeObserver],
      initialRoute: '/',
      onGenerateRoute: _router.route,
    );
  }
}
Easy peasy lemon squeezy!
Conclusion
We made great progress with our architecture today. Honestly, I believe that most small-ish project that follow this simple MVVM pattern with this routing setup will be easy to maintain and scale to a certain point.
For medium-large size applications/teams, we'd be better off organising our code in a couple more layers to ensure we won't have 1000s of lines in each view model. Have a read at Part 3 to learn more about it.
Don't forget to check out the full source code for this project on Github.
Thanks for reading and let me know what you think. Feel free to message me up on Twitter too!

